
Bathroom Stone Floor Guide: Materials, Safety, and Design

The most popular bathroom advice starts with the wrong question: marble or granite? That choice matters, but it comes after the surface specification. A polished marble can be more dangerous than a properly textured granite, while a carefully finished marble can work well outside the shower. For a bathroom stone floor, the decisive questions are how the surface behaves under wet bare feet, which slip class it achieves, and how the stone will be sealed and installed.
Indian bathrooms make this distinction practical, not academic. Hard-water deposits, soap residue, monsoon humidity, and the transition between dry and wet zones quickly expose a finish that looked perfect under showroom lighting. The wider market context reinforces the opportunity: India's tiles, sanitary ware and bathroom fittings market was valued at USD 9,946.3 million in 2025 and is projected to reach USD 17,285.4 million by 2034, with a projected 6.14% CAGR from 2026 to 2034 (India bathroom stone flooring guide). Your bathroom floor deserves a specification, not just a colour decision.
Table of Contents
- Why Finish Beats Stone Type in a Bathroom
- Stone Options for Bathroom Floors
- Slip Ratings and Wet-Zone Safety
- Sealing, Waterproofing and Underfloor Heating
- Installation Details That Decide Long-Term Performance
- Design Directions From the Varun Marbles Gallery
- Maintenance Routine and Showroom Buying Checklist
Why Finish Beats Stone Type in a Bathroom
A stone species doesn't tell you whether a bathroom floor is safe. The finished surface does. Polished Carrara marble and flamed granite represent completely different visual and tactile experiences, but either can be a poor choice if the installed surface offers inadequate wet slip resistance. Conversely, honed marble or leathered granite can be sensible in the right zone when the finish, drainage, sealing, and maintenance plan are properly matched.
Start with the foot, not the showroom sample
Showroom samples are usually dry, clean, and viewed from above. A working bathroom adds bare feet, running water, shampoo, soap film, and residue from hard water. Glossy surfaces reflect light beautifully, but that same smoothness can reduce grip when water sits beneath the foot.
This is why the usual “marble versus granite” debate is incomplete. A dense stone doesn't automatically become a safe floor, and a visually soft stone doesn't automatically fail. Before choosing a slab, ask the supplier for the tested slip classification of the proposed finish, not just the name of the stone.
Practical rule: Treat the finish as a performance specification. Treat the stone type as the material selected to carry that specification.
Granite generally offers more freedom for aggressive textures, while marble rewards restraint because harsh mechanical finishes may alter its colour and visual character. The correct decision also changes by zone. A dry vanity area may accept a smoother honed surface, while the shower entrance needs more grip and better water management.
The difference between honed and polished marble is therefore a functional issue as much as a visual one. Honing removes the mirror-like reflection and creates a more forgiving underfoot feel. Polishing belongs on walls, vanity tops, and carefully controlled decorative areas far more often than it belongs inside a wet shower floor.
Indian bathroom conditions punish weak specifications
Flooring guidance focused on India commonly positions granite as excellent for water resistance when sealed, with Kota stone and flamed granite suited to wet zones. Traditional stone bathroom applications are also commonly planned around service lives of 25+ years, according to the India bathroom flooring guide. Longevity, however, depends on the complete assembly, not a stone label.
India's related ceramic tiles market illustrates how strongly floor applications shape demand. Floor tiles held 52.0% market share in 2025, while residential applications held 55.0%, as reported in the same bathroom stone flooring market overview. Those figures point to a practical reality: bathroom floors sit inside a large residential and renovation market where durability, cleaning, and slip control matter more than a temporary showroom impression.
Choose the finish first. Then confirm the rating, sealing method, drainage falls, adhesive, grout, and maintenance routine. That sequence prevents an expensive stone from becoming an avoidable safety problem.
Stone Options for Bathroom Floors
The four credible candidates have different strengths, and none should be specified by appearance alone. Marble gives character, granite gives toughness, quartz gives consistency, and onyx gives theatre. Their suitability depends on where the floor sits, how much water it receives, and how much maintenance the owner will perform.
| Stone | Porosity | Typical finish options | Slip rating, common | Maintenance demand | Cost tier, INR/sq ft |
|---|---|---|---|---|---|
| Marble | Moderate to high, depending on type | Honed, leathered, polished | Honed surfaces commonly target R10; wet zones need confirmation | High | Premium |
| Granite | Low to moderate, depending on type | Flamed, leathered, bush-hammered, honed, polished | Textured finishes commonly target R11 to R12 | Moderate | Mid to premium |
| Quartz, engineered stone | Very low, generally near-zero porosity | Polished, matte, selected leathered finishes | Rating must be verified for the exact product | Low to moderate | Mid to premium |
| Onyx | High sensitivity and variable porosity | Honed, polished, wax-topped, backlit feature treatment | Usually unsuitable for aggressive wet-floor use without project-specific testing | Very high | Luxury |
Marble
Marble is the right choice when veining, warmth, and a natural surface matter more than low maintenance. Use honed or leathered marble for floors, especially around a vanity or in a dry bathroom zone. White and pale marbles show soap residue and etching, while darker or green marbles can expose water marks and polishing defects.
Polished green marble underfoot is a poor wet-floor decision, regardless of its colour depth. Marble needs a penetrating sealer, regular inspection, and a cleaner that won't attack calcium-based stone. If your priority is an expressive floor and you're prepared to maintain it, marble works. If you want a floor that can be ignored, it doesn't.
Granite
Granite is the strongest natural candidate for demanding bathroom floors. It tolerates heavy use, supports textured finishes such as flamed and bush-hammered surfaces, and generally gives the installer more room to create grip without losing structural confidence.
Black Galaxy granite with a flamed finish can look dramatic outside the shower, but confirm the actual tested rating because colour and pattern don't determine slip performance. Granite still benefits from sealing, and a rough finish can hold soap residue if the drainage and cleaning routine are poor.
Quartz
Engineered quartz offers visual consistency and very low porosity, which makes it attractive for owners who dislike staining and frequent sealing. It can work around bathroom floors and surfaces where the manufacturer approves the use, but don't treat quartz as a universal wet-zone material.
Quartz composites typically don't accept the same aggressive textures as granite. Their resin content and engineered surface also mean you should confirm heat, chemical, and wet-floor compatibility with the specific product. The comparison of marble and vitrified tiles is useful when you're weighing natural variation against predictable manufactured performance.
Onyx
Onyx is a feature material, not my default bathroom floor recommendation. Its translucency and layered colour make it exceptional for a powder-room floor detail, wall panel, or backlit focal point, but it demands disciplined sealing, careful cleaning, and close control of water exposure.
Unsealed beige limestone near a shower demonstrates the wider principle. A porous, pale surface can absorb residue and darken at the exact point where the owner expects a clean spa finish. Onyx carries the same warning with a much higher visual and replacement cost.
Slip Ratings and Wet-Zone Safety
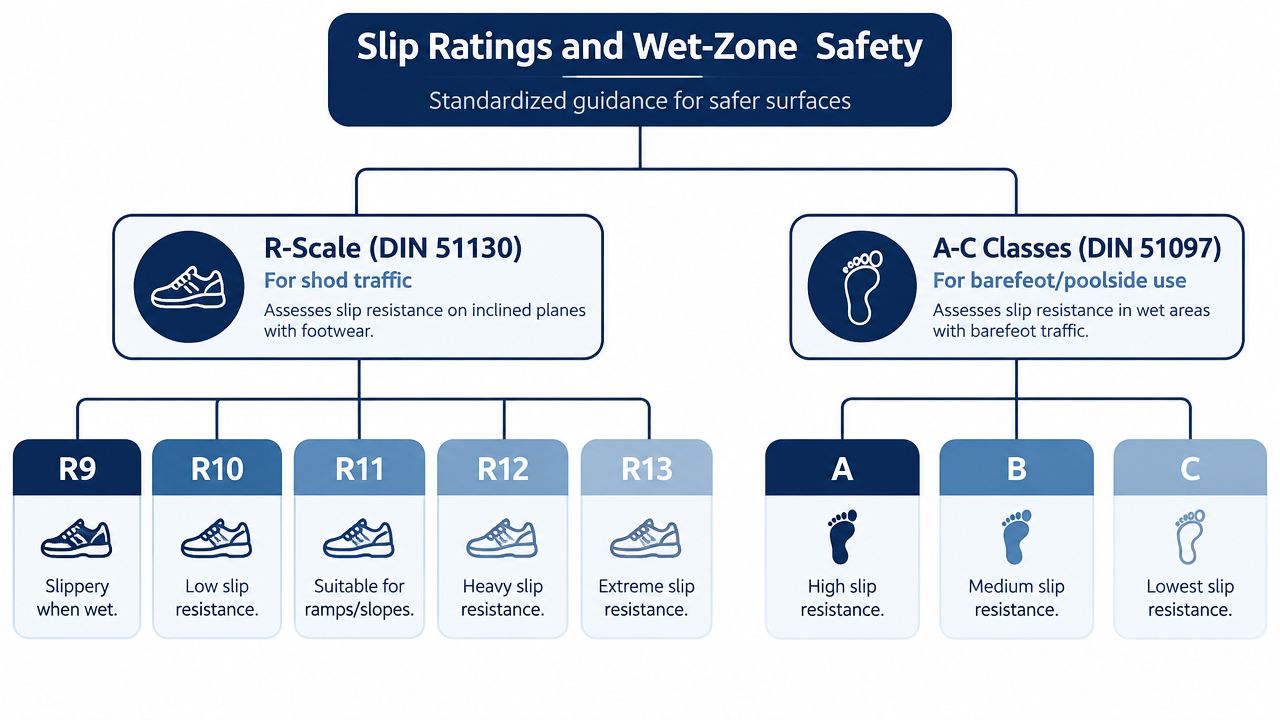
Slip ratings turn a vague safety conversation into a specification. The R-scale under DIN 51130 evaluates shod traffic on an inclined surface, while A, B, and C classes under DIN 51097 address barefoot use in wet areas. A bathroom floor should be assessed for the way people use it, so the barefoot class is especially important near showers.
Understand what the ratings mean
The R-scale progresses from R9 through R13. R9 offers the lowest level in this range, R10 provides more practical resistance for general indoor areas, R11 suits steeper or wetter conditions, R12 provides heavy resistance, and R13 represents extreme resistance. These categories were developed for footwear and ramp conditions, so they shouldn't be the only test used for a barefoot shower floor.
The barefoot system uses A, B, and C. A is the lower barefoot classification in this group, B provides greater resistance for wet barefoot use, and C is the strongest classification for demanding conditions. Don't accept a generic statement such as “anti-skid” on an invoice. Ask for the classification of the exact stone finish and batch.
Map the rating to each bathroom zone
For a real layout, I'd use the following as a starting specification, then verify the selected product through its test documentation:
- Dry zone outside the shower: R10 and barefoot B are sensible targets where wet feet may still cross the floor.
- Main wet area: Move to R11 and B when water, soap, and regular barefoot use are expected.
- Shower tray or rain-shower area: Specify R12 and C where the surface remains persistently wet.
- Outdoor-to-indoor transition or textured steps: R13 and C may be appropriate for the most demanding transition zones.
Finish drives the result. Honed marble commonly lands around R10, while flamed or leathered granite can commonly reach R11 to R12. Bush-hammered surfaces can move beyond that range, but roughness also increases cleaning effort and may feel uncomfortable in a private shower.
The India anti-skid bathroom tile guidance makes the key recommendation clearly: general bathroom floors commonly target R10, while shower or barefoot wet zones should move towards R11 or barefoot Class B/C. Polished marble or granite should be avoided in wet bathrooms because gloss increases slip risk, regardless of stone quality.
Sealing, Waterproofing and Underfloor Heating
Sealing protects the stone. It doesn't turn a polished surface into a safe shower floor, and it doesn't replace waterproofing beneath the installation. Treat these as separate systems, with separate responsibilities.
Seal the stone correctly
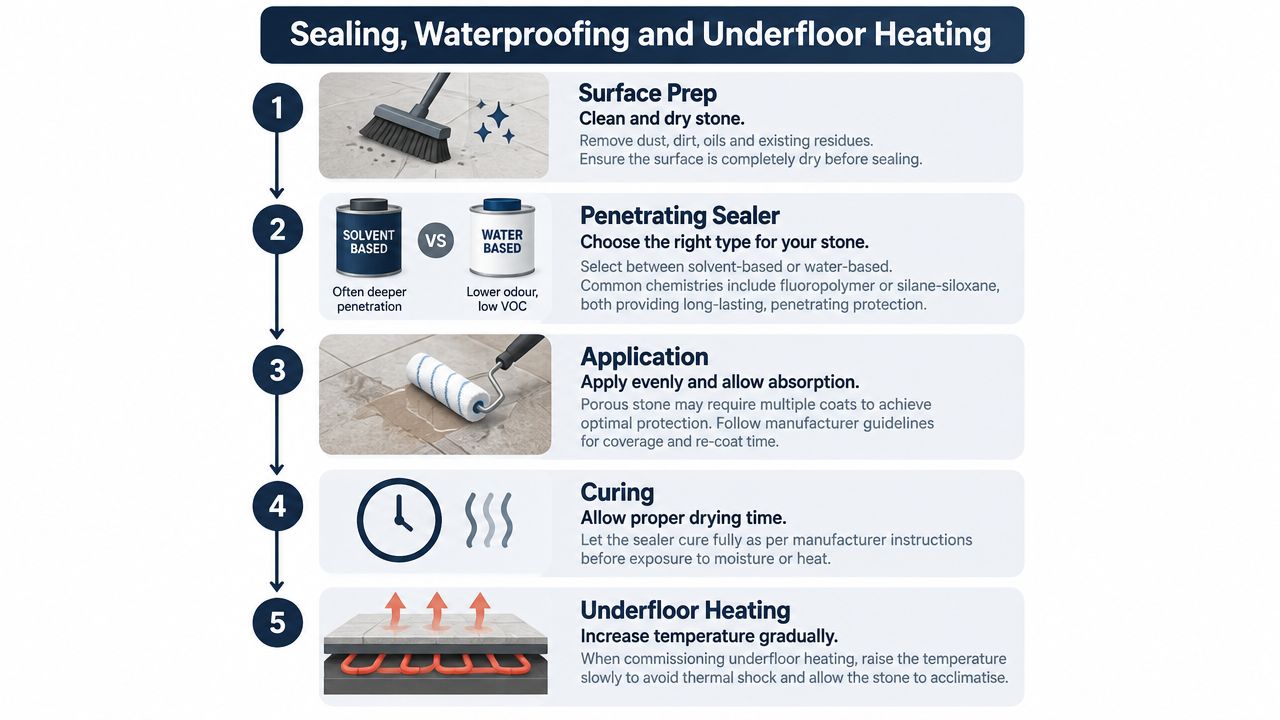
Start with a clean, dry surface. A penetrating sealer sits within the stone rather than forming a thick surface film, and the correct product depends on the stone's porosity and the expected exposure. Solvent-based and water-based formulations behave differently during application, while fluoropolymer and silane-siloxane technologies offer different performance profiles.
Your installer should test the sealer on an offcut or hidden area first. Highly porous marble, limestone, and onyx may need more than one coat, but more coats aren't automatically better if the first layer hasn't absorbed and cured. Follow the product data sheet for coverage, dwell time, buffing, and curing.
The sealer is a stain-control layer, not a slip-control layer.
Never seal over a damp substrate. Trapped moisture can cloud the finish, interfere with adhesion, and leave the stone looking uneven. Polished marble remains a high-risk shower floor even after sealing because the smooth surface still offers poor wet barefoot grip.
Build the waterproofing below the stone
A wet room needs a continuous waterproofing strategy beneath the stone. Depending on the construction, that may be a liquid-applied membrane or a sheet membrane under the screed and tile assembly. Corners, pipe penetrations, shower niches, and drain connections need compatible reinforcement and detailing.
The installer must respect the membrane manufacturer's curing period before laying stone. A primer may be necessary on the substrate or over a cured membrane, and the adhesive must be approved for the complete system. If you already suspect water escape, diagnose the leak in bathroom before covering the area with expensive stone.
Manage heated floors carefully
Underfloor heating can work beneath stone, but the assembly needs room to move. Keep the slab thickness within the heating system and adhesive manufacturer's limits, with 20 to 30 mm often treated as a practical maximum range for floor slabs. Dense stones such as granite need gradual heat-up to avoid thermal shock, and onyx or some quartz composites call for gentler heating curves.
A decoupling mat helps manage movement caused by thermal expansion. Don't switch the heating on while the adhesive is still curing, and follow the system's ramp-up protocol rather than testing the warmth immediately after installation.
Installation Details That Decide Long-Term Performance
A premium slab won't rescue a weak substrate. Stone is less forgiving than ordinary ceramic tile, so the installer must control movement, moisture, coverage, and level before the first piece is fixed.
Prepare the base before selecting adhesive
The substrate must be rigid, sound, clean, and within the stone manufacturer's deflection limits. Repair cracks, remove contaminants, and check that the screed has dried sufficiently for the proposed membrane and adhesive system. Full-bed coverage matters because voids beneath stone create weak points and can concentrate loads.
For wet zones, I prefer a suitable cementitious adhesive system over ready-mixed adhesive. Ready-mixed products may be convenient for limited interior applications, but they aren't the automatic choice for a damp floor carrying dense natural stone. Use the adhesive class recommended for the stone, substrate, membrane, slab size, and heating system.
Make water travel where the designer intended
Drainage falls are not a finishing detail. They determine whether water leaves the floor or remains as a film beneath bare feet. A general bathroom floor can be planned around a 1 in 80 minimum fall, while a shower may need 1 in 60, subject to the drain, waterproofing system, and local construction requirements.
| Zone | Substrate and membrane | Drainage fall | Joint width | Grout type |
|---|---|---|---|---|
| Dry vanity zone | Rigid screed with compatible waterproofing where required | 1 in 80 minimum where water can reach the floor | Calibrated to slab and movement needs | Cement grout with latex additive or epoxy |
| Main bathroom floor | Prepared screed with continuous wet-area membrane | 1 in 80 minimum | Sized to slab tolerance and layout | Epoxy preferred for demanding wet use |
| Shower floor | Sloped screed, reinforced membrane, sealed drain connection | 1 in 60 | Narrow but not closed, with movement allowance | Epoxy or approved high-performance grout |
| Shower threshold and drain edge | Fully detailed membrane and compatible transition | Directed into drain | Movement joint at changes of plane | Epoxy at exposed wet joints |
Movement joints belong at perimeters, changes of plane, thresholds, and transitions to other materials. Joint widths should reflect the slab's dimensional tolerance, not a designer's wish for invisible lines. Large-format stone also needs lippage control, proper clips where appropriate, and a layout that doesn't force uneven edges into the drain.
Choose epoxy grout where stain resistance and low water absorption justify the cost. A high-quality cement grout with a latex additive can work when correctly mixed, cured, and sealed, but it demands more maintenance. Keep grout lines open enough to perform, and finish the shower drain with a clean edge profile or stone-inlay grate rather than an improvised cut.
Before handover, demand adhesive coverage photos, recorded joint widths, and a sealing log. Those documents reveal whether the installation was specified and executed as a system.
Design Directions From the Varun Marbles Gallery
The safest bathroom stone floor doesn't need to look institutional. The trick is to assign different textures to different zones instead of forcing one polished slab across the entire room.
Four visual treatments that translate well
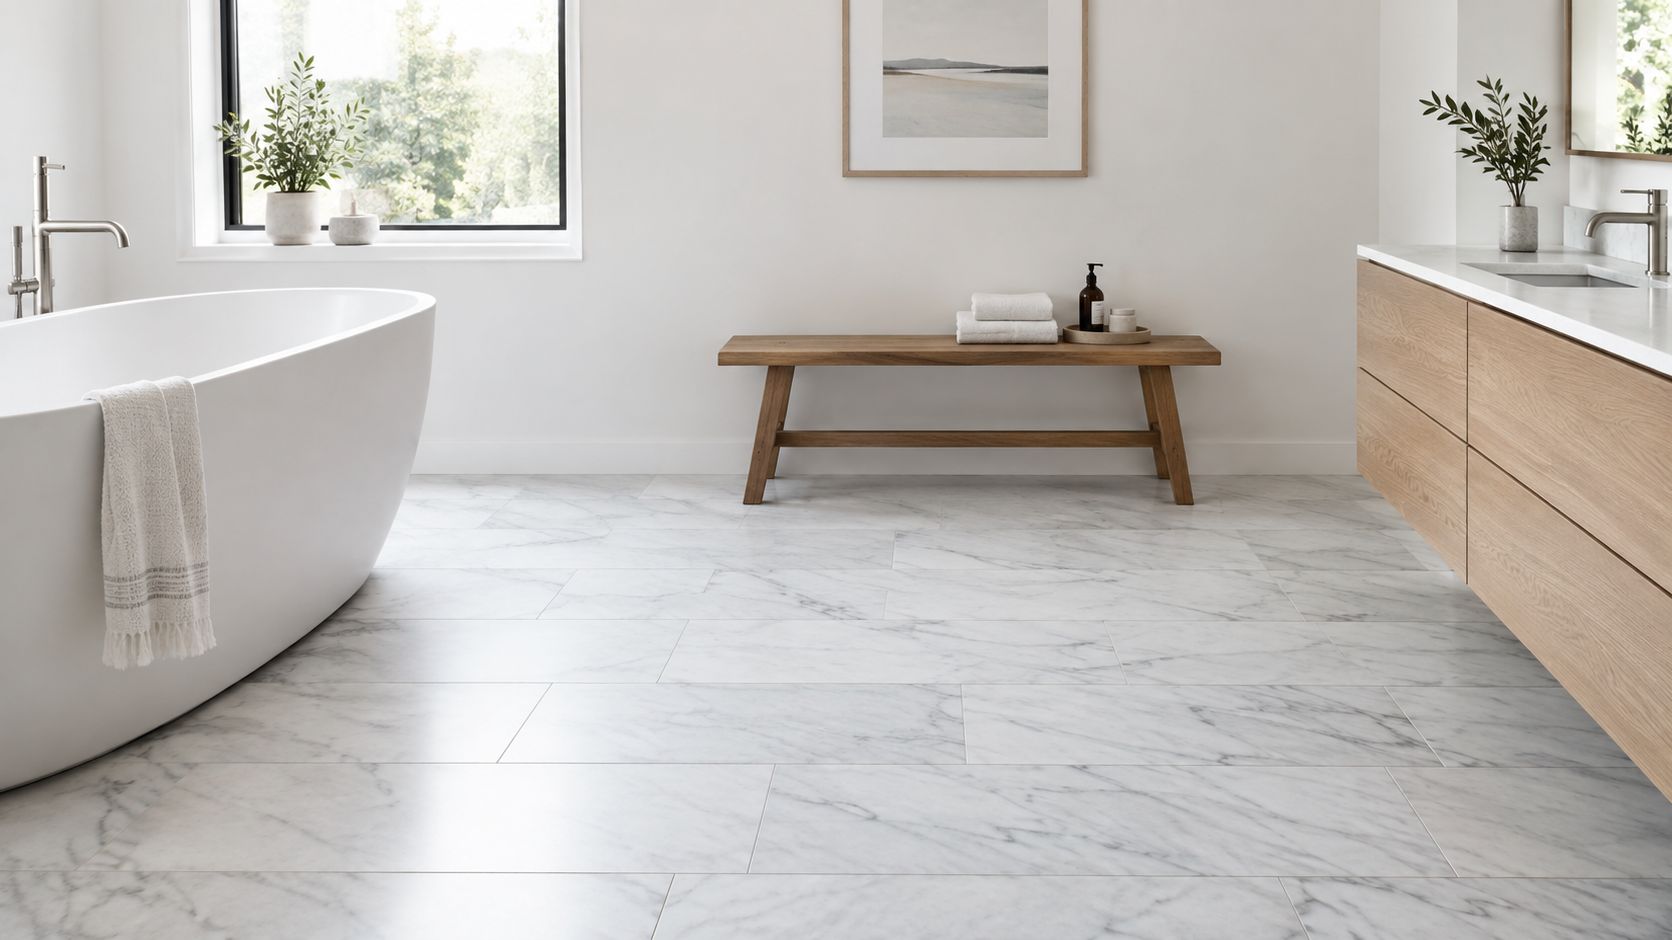
A quiet dry zone can use honed Carrara marble in a 600 x 300 plank layout. The format gives the floor a calm rhythm, while the honed surface reduces reflected glare and creates a more comfortable transition around the vanity. Keep the shower floor separate if the Carrara finish doesn't achieve the required barefoot classification.
For a stronger wet-area language, use flamed Black Galaxy granite outside the shower where a dark, tactile surface can deliver practical grip. The pattern hides small marks better than pale marble, but the roughness needs disciplined cleaning so soap residue doesn't settle into the texture.
Leathered Statuario suits a family bathroom where touch and visual depth matter. Its low-reflectivity texture supports a softer, more tactile floor, but Statuario still needs a sealer and a confirmed slip test. Don't assume that the leathered label alone guarantees a suitable classification.
A powder room offers more freedom. Book-matched Honey Onyx can become a feature panel or a carefully controlled floor composition where water exposure is occasional and the surface receives appropriate sealing and a wax-topped treatment. Onyx should stay out of a relentlessly wet shower unless the project team has verified the full application.
Let layout carry the luxury
A honed limestone field in a 600 x 600 format can make a room feel settled and spacious, while a smaller herringbone mosaic in the shower creates texture and additional grout traction. The contrast works because the layout responds to the zone rather than treating the room as one flat canvas.
Book-matching creates a different effect. A continuous vein through paired slabs can turn a bathroom floor into a single artwork, but the installer needs the layout approved before cutting. Photograph the slab arrangement, mark the orientation, and confirm that the vein remains intentional around the drain, threshold, and vanity.
A continuous material palette doesn't require a continuous finish.
Use brass or stone-inlay drain grates to keep the detailing coherent. A brass grate can echo tapware, while a stone-inlay grate makes the drain recede into the floor. Both options depend on precise falls and waterproofing, so the design decision must reach the installer before fabrication.
Varun Marbles supplies natural marble, granite, onyx, and engineered quartz, with slab selection, cut-to-size fabrication, edge profiling, surface finishing, and installation coordination available through its Gurugram operation. Treat the gallery as a place to inspect the actual slab and finish in person, then take the selected sample through the slip, sealing, and installation checks already defined.
Maintenance Routine and Showroom Buying Checklist
No stone is zero-maintenance. The sensible goal is controlled maintenance, meaning the cleaner, sealer, grout, and inspection rhythm all match the material and the amount of water it receives.
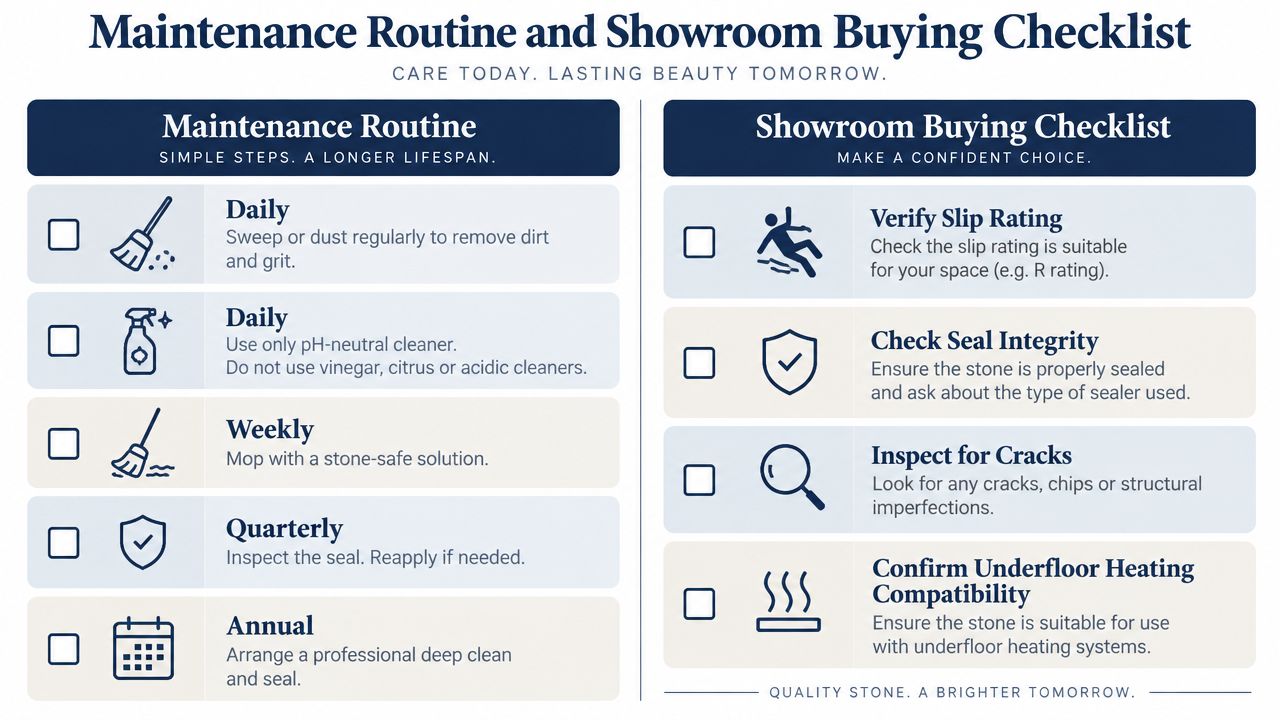
Daily care should remove grit and standing water before they become abrasion or residue problems. Use a pH-neutral stone cleaner and a soft mop or cloth. Vinegar and citrus cleaners are poor choices for marble and onyx because acidic products can etch calcium-based surfaces and leave dull patches.
Use a simple care rhythm
- Daily: Sweep or dust the floor, remove standing water, and clean splashes with a pH-neutral product.
- Weekly: Mop with a stone-safe solution, then rinse away concentrated cleaner and dry the surface.
- Quarterly: Inspect the sealer, grout, drain edges, and joints. Reapply sealer when the stone's absorption and the product schedule indicate it is needed.
- Annually: Arrange a professional deep clean and sealing review for porous marble, limestone, and onyx. Granite may need less frequent attention, but the inspection still matters.
Don't use one routine for every stone. Marble and onyx need the strictest chemical discipline. Granite can tolerate more demanding use, but textured finishes need careful brushing so residue doesn't lodge in the surface. Quartz generally needs less sealing, yet abrasive pads, harsh solvents, and unapproved heat can still damage the finish.
Light etching on marble is a surface issue, not a reason to replace the slab. A stone professional can spot-hone the affected area and blend the finish. Granite may also need local honing where traffic has altered the sheen. Quartz usually calls for careful stain treatment and removal of grout haze using a product approved by the manufacturer, not an improvised acid wash.
The guide to hard-water stains on marble is worth keeping with your cleaning products, especially in areas where mineral deposits return quickly. Prevention is safer than repeated aggressive descaling.
Take this checklist to the showroom
- Confirm the slip rating: Put the exact R and barefoot classification on the invoice, including the finish.
- Match the batch: Require batch-matched slabs for veined marble, quartz, and onyx.
- Record the sealer: Note the product brand, formulation, and number of coats.
- Check thickness tolerance: Compare the supplied slab with the approved sample and fabrication drawing.
- Request a wet-zone mock-up: Test the finish, drain detail, grout colour, and visual scale together.
- Photograph book-matched layouts: Approve the slab sequence before cutting begins.
- Ask about heated floors: Request heat-conductivity and compatibility information when underfloor heating is planned.
- Leave with maintenance instructions: Get a written schedule for cleaning, inspection, and resealing.
Choose the stone only after the wet-zone rating, finish, membrane, drainage, and maintenance plan are agreed. Visit Varun Marbles to inspect hand-selected marble, granite, quartz, and onyx slabs in person, then discuss cut-to-size fabrication, finishing, and installation coordination for your bathroom stone floor.