
Granite Slab Measurements: A Practical How-To Guide

A kitchen renovation often goes wrong before the stone reaches the site. A family in Chennai ordered a granite island from a sketch, only to find the finished top 14 mm short at the breakfast-bar end. The overhang no longer worked, and the fabricator had to redo the piece.
That kind of failure rarely comes from one careless tape reading. Granite slab measurements operate at three layers: the raw slab selected at the yard, the finished cut produced by the fabricator, and the installed fit against cabinets, walls, and services. A slab can be correctly selected yet badly cut, or accurately fabricated yet impossible to seat on an uneven base.

Table of Contents
- Why Accurate Granite Slab Measurements Matter
- Standard Granite Slab Sizes in the Indian Market
- Choosing the Right Slab Thickness
- Templating Countertops and Floors Step by Step
- Overhangs, Cutouts, and Seam Placement Rules
- Verifying Measurements Before You Hand Over to the Fabricator
- Pre-Installation Checklist and Common Measurement Mistakes
Why Accurate Granite Slab Measurements Matter
A slab may look large enough at the yard and still fail at installation. The practical check has three layers: the raw slab selected, the finished piece cut by the fabricator, and the installed fit against cabinets, walls, and services. Controlling each layer prevents a usable slab from becoming a poor countertop.
The three measurement layers
At the yard, inspect more than overall size. Vein direction, edge defects, trimming, and the slab's actual finished dimensions affect the usable yield. Indian standard references commonly use 3 feet by 8 feet, or 900 mm by 2400 mm, while cutter and gangsaw formats provide different seam and layout choices. The BIS granite slab measurement reference provides the relevant Indian standard framework rather than relying on generic US or European dimensions.
The fabricator controls the second layer. The cut-list must show finished edges, sink and hob openings, polished profiles, sawing allowance, slab direction, thickness, and every cutout location. An overall length and depth drawing is incomplete. It can produce a correct-looking piece with the wrong edge, opening, or seam position.
Installation supplies the final test. Walls bow, corners fall out of square, and cabinets may sit slightly out of level. A granite piece can match the drawing yet rock on the base or leave a visible gap if measurements were taken against unfinished plaster instead of the completed wall.
Practical rule: Measure the surface you'll install, not the surface you hope the building will have.
If granite and quartz are both under consideration, this granite quartz decision guide helps frame how material choice affects fabrication and installation decisions. For granite, confirm the selected raw slab, approve the fabrication drawing, and recheck the finished site before dispatch. Each check addresses a different tolerance, so skipping one leaves the final fit to chance.
Standard Granite Slab Sizes in the Indian Market
A slab can fit the yard's rack and still fail at the finished installation. Indian granite measurement therefore has three layers: the raw slab selected, the finished cut produced, and the installed fit against cabinets, walls, and adjoining surfaces.
Indian yards generally organise stock into cutter slabs and gangsaw slabs. Cutter slabs suit smaller work, vanity tops, and cut-to-size fabrication. Gangsaw slabs provide broader faces for long counters, wall panels, and layouts where reducing seams matters.
A common Indian-market reference lists a standard slab at approximately 3 feet by 8 feet, or 900 mm by 2400 mm. Other trade formats include large slabs around 240 × 60 cm, 260 × 60 cm, and 280 × 60 cm. Cutter slabs may be around 180 × 60 cm, while gangsaw pieces can reach approximately 260 × 160 cm (Indian granite slab formats and applications).
| Format | Nominal Size (L x W) | Typical Usable Area | BIS Tolerance (L/W) | Best Fit |
|---|---|---|---|---|
| Cutter slab | Around 180 × 60 cm | Smaller cut-to-size pieces | ±2 mm | Vanities, compact kitchens, flexible fabrication |
| Standard Indian slab | 900 × 2400 mm | Countertop and flooring components after trimming | ±2 mm | Common residential work |
| Large-format slab | Around 240 × 60 cm to 280 × 60 cm | Longer runs with fewer joints | ±2 mm | Kitchen counters and wall panels |
| Gangsaw slab | Up to approximately 260 × 160 cm | Broad panels and premium layouts | ±2 mm | Islands, flooring, larger architectural surfaces |
Nominal dimensions are only the starting point. The BIS framework specifies polished granite building-stone slabs as rectangular or square, with length and breadth tolerance of ±2 mm and thickness tolerance of ±1 mm (BIS standard for polished granite building-stone slabs). That small difference can shift a joint, alter an edge profile, or affect backsplash alignment. Confirm the actual slab before approving the cutting plan.
At the yard, run a straightedge across the face to check bowing, then inspect the corners and centre. Compare adjoining slabs for vein direction and colour continuity. For an L-shaped kitchen, request slabs from the same block or bundle where possible, and mark the intended runs on the selected pieces before cutting.
Colour affects layout as much as size. Varun Marbles' signature brown granite reference illustrates why pattern selection deserves attention, but the physical slab still requires inspection under the lighting used at the installation site. The raw slab, finished cut, and installed fit each need their own check.
Choosing the Right Slab Thickness
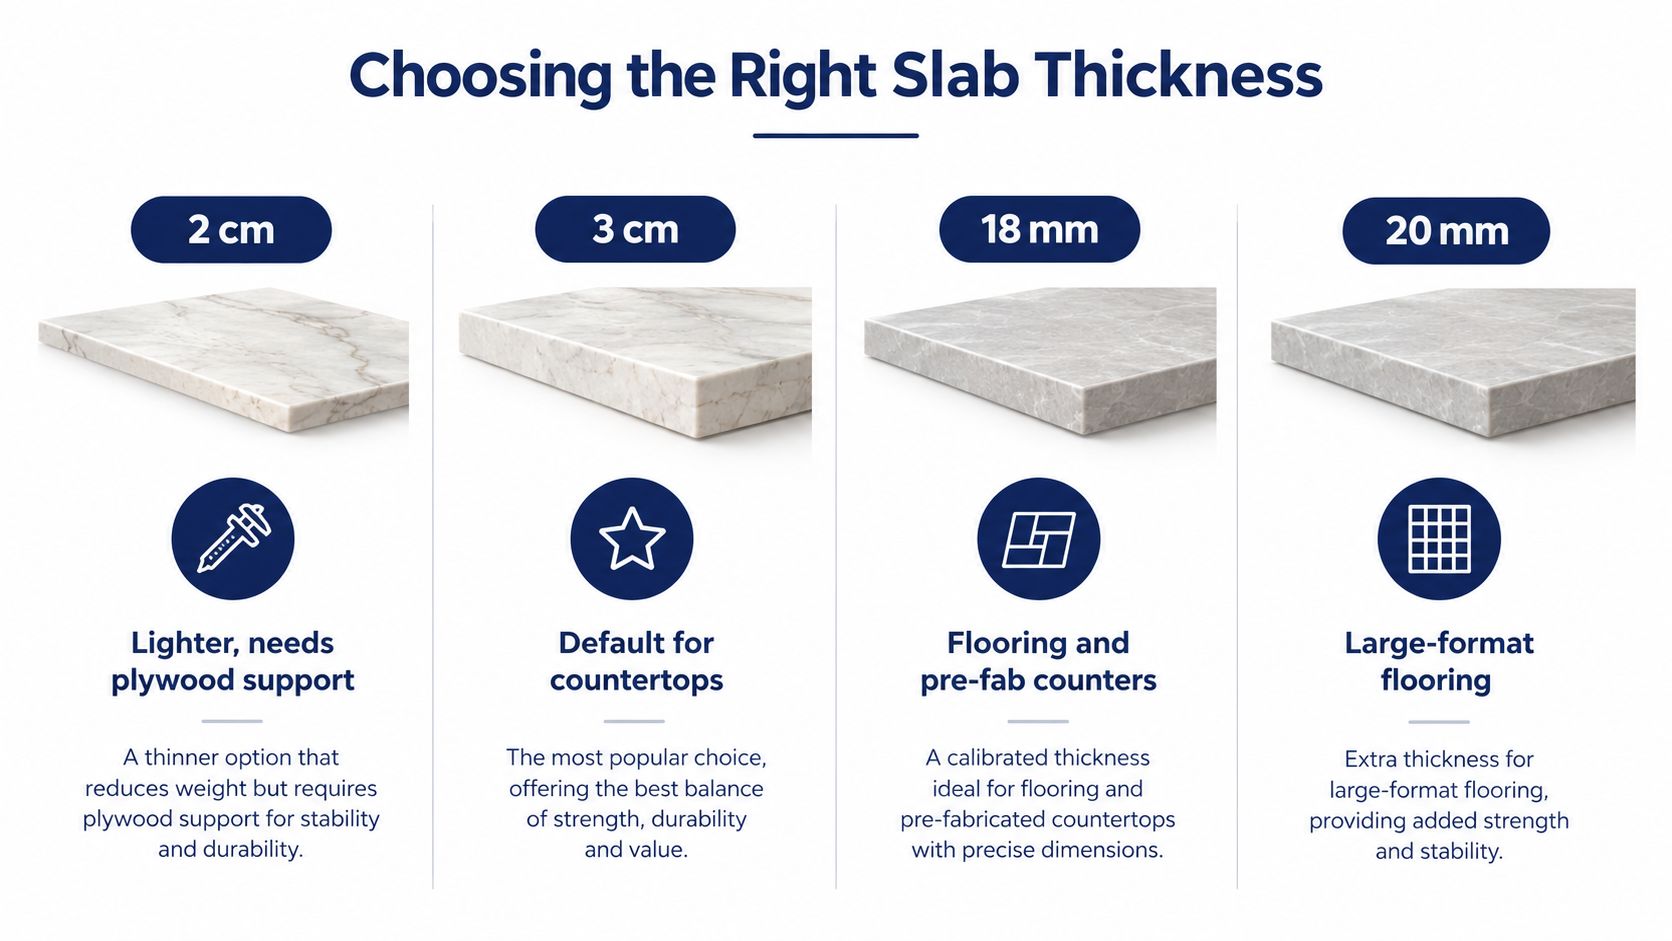
Indian fabricators commonly quote 2 cm and 3 cm granite slabs for worktops. Suppliers may also offer calibrated material around 18 mm and 20 mm, particularly for flooring, wall applications, and prefabricated surfaces. The right choice depends less on appearance than on span, cutouts, support, and access to the building (Indian granite countertop thickness options).
Countertop comparison
A 3 cm slab gives a substantial edge and generally suits kitchen worktops where the stone must bridge cabinet openings and accommodate sink or cooktop cutouts. It also gives the fabricator more material for edge treatments. A 2 cm slab weighs less and can be easier to carry through a high-rise, but it usually needs plywood backing, a built-up edge, or another properly designed support system.
The thinner option isn't automatically wrong. It becomes risky when the buyer chooses it for a long unsupported span, a large cutout, or a projecting breakfast bar without telling the fabricator how the substrate will be built. Thickness changes handling, seam planning, and the amount of support required, not just the visible edge.
For floors, 18 mm and 20 mm calibrated slabs can work where the substrate has been prepared correctly and finished levels have been coordinated with doors, thresholds, and adjacent materials. Calibration helps the installer work to a more consistent thickness, but it doesn't remove the need to check the screed and transition heights.
Make the decision on site conditions
Use this decision rule:
- Choose 3 cm when the counter has demanding cutouts, longer spans, or a substantial visual edge.
- Choose 2 cm when the support detail is designed in advance and lighter handling is valuable.
- Choose calibrated 18 mm or 20 mm for flooring or prefabricated applications where finished floor height matters.
- Check building access first. A large, thick slab may require specialist lifting rather than a normal residential lift.
Thickness guidance should sit beside the full project budget, not apart from it. Varun Marbles' quartz slab price reference for India is useful when comparing alternative surface materials, but the same measurement discipline applies to any slab you order.
Templating Countertops and Floors Step by Step
Fabrication should begin from a controlled template, not a rough room sketch. The template records what the cabinets, walls, services, and finished edges are doing at the site.
Prepare the base
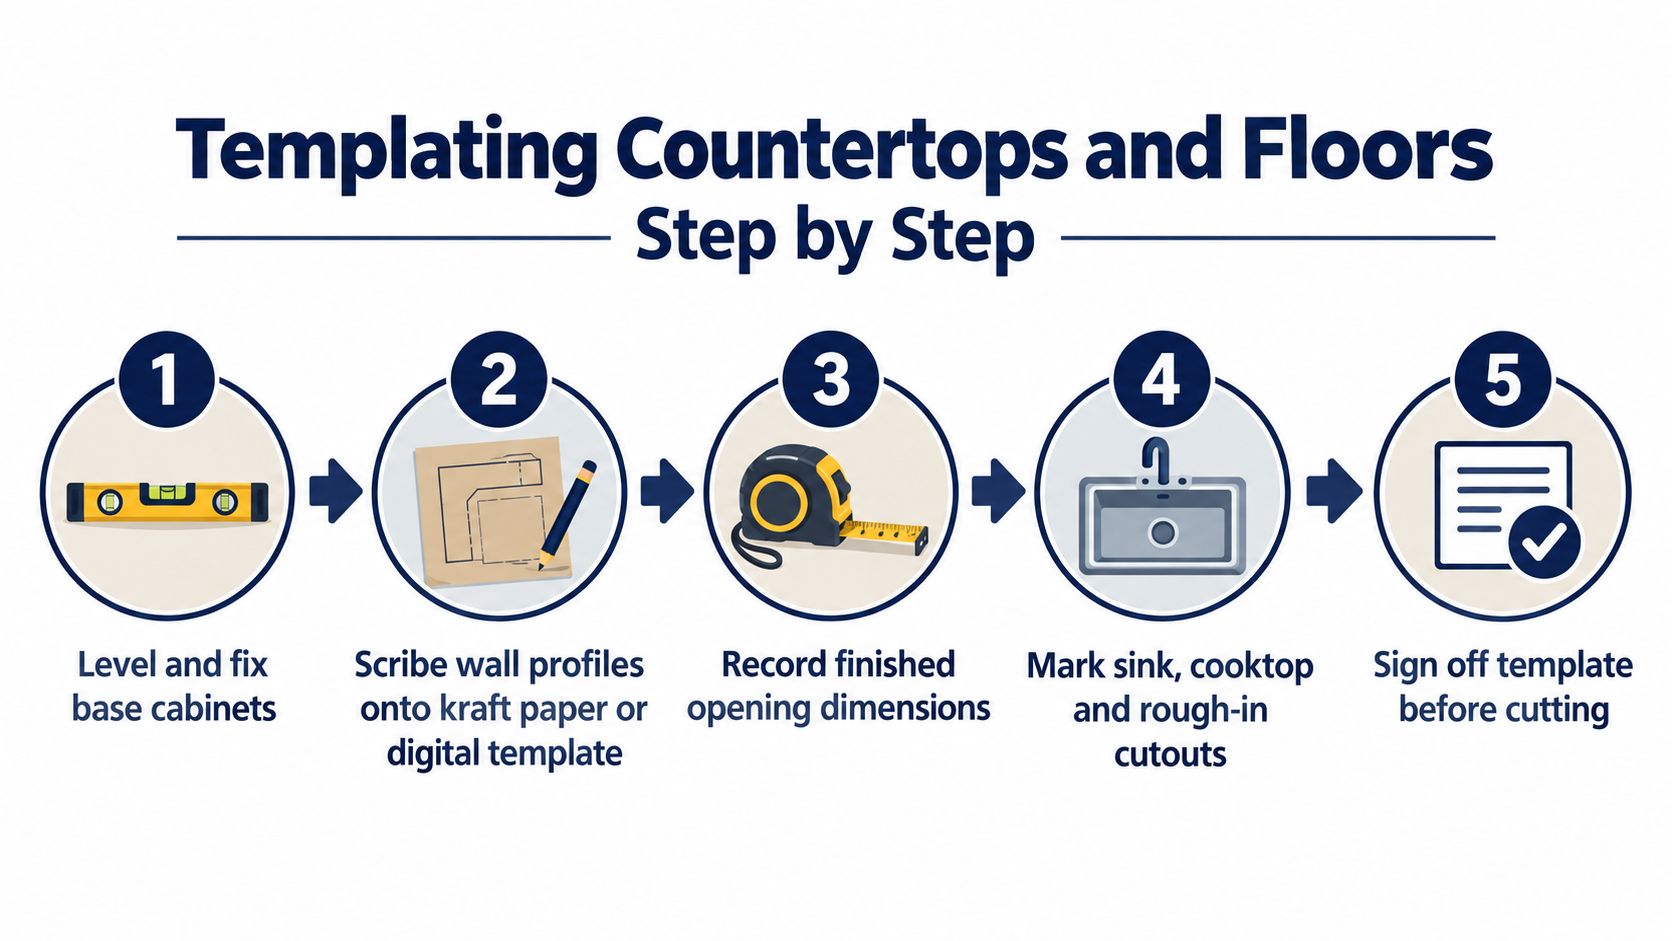
First, confirm that the base cabinets are level, fixed, and ready to carry the stone. If the cabinet line can still move, the template is premature. Check the front line, wall line, and corner conditions with a spirit level and straightedge. Mark any packers, support rails, or steelwork that will remain below the slab.
Then scribe the wall profile from corner to corner onto kraft paper or digital templating film. Don't assume a wall is straight because it looks straight. The template should carry a clear label for every run, a direction arrow, the polished edges, the wall edges, and the position of each corner.
Record openings from approved models
Measure sink, hob, cooktop, faucet, soap-dispenser, and water-purifier tap positions from the cabinet maker's approved cutout sheet. Don't centre a sink by eye or measure from an unfinished wall. Record the appliance model number and the required opening separately, because the visible flange and the stone opening are not always the same.
Allow 3 mm clearance at each edge that meets a wall, and keep inside corners square to within 1 mm where the design requires a tight return. For a standard 2 cm counter, a 100 mm overhang should have suitable support beneath it. If the design calls for a larger projection, the structural detail must be agreed before the cut-file is released.
Floor templating follows the same logic. Mark a chalk grid on the screed, identify low spots, and record door jambs, closets, steps, and thresholds separately. This gives the estimator a measured drawing rather than a guess, and it helps the saw operator plan the correct set-up.
Before cutting, review the signed template against the room and the selected slab. The following video can help homeowners understand why professional templating depends on site conditions rather than cabinet drawings alone.
Overhangs, Cutouts, and Seam Placement Rules
Granite doesn't fail because a measurement is aesthetically imperfect. It fails when a projection, opening, or joint creates a weak point that the support detail hasn't addressed.
For 2 cm slabs, unsupported projections need careful bracket or substrate planning. A kitchen overhang around 100 mm should not be treated as self-supporting. With 3 cm material, a projection approaching 300 mm may be possible when the fabricator and structural installer provide an appropriate corbel or steel support. A breakfast bar beyond that requires a designed steel plate or full corbel arrangement, particularly near sinks and other openings.
Cutouts need the same discipline. Internal corners shouldn't be forced into sharp points, because stress gathers there. A corner radius under 25 mm may be refused by the fabricator, while cooktop flanges commonly need 8 to 10 mm clearance all around. Undermount sinks require the reveal to be coordinated with the selected edge profile, often using a 3 mm reveal as the starting point.
A beautiful overhang is still a structural detail. Draw the support before you approve the stone.
Keep seams out of stress zones
A seam through a sink bowl or cooktop opening is poor practice. It interrupts the stone where the cutout has already reduced strength and where moisture, heat, and daily impact are concentrated. An L-shaped counter also needs a planned joint, rather than a seam running blindly across the diagonal.
| Feature | Acceptable | Avoid |
|---|---|---|
| Sink position | Place the seam away from the bowl and its cutout corners | Running a joint through the sink opening |
| Cooktop position | Keep the joint clear of the appliance opening and its support zone | Placing the seam through the hob or cooktop cutout |
| L-shaped layout | Use a controlled joint near a cabinet divider or planned corner | Cutting across the diagonal of the L |
| Cabinet support | Keep the seam close to a divider where possible | Leaving the joint over a wide unsupported span |
| Traffic and sight lines | Put the seam in a low-attention, well-supported area | Placing it across the main working line |
Keeping a seam within 100 mm of a cabinet divider can help support the joint and make the line less conspicuous. A poorly placed seam may leave a 2 mm step that grinding cannot fully disguise, especially if the cabinets or substrate aren't level.
Verifying Measurements Before You Hand Over to the Fabricator
The final check should be done before the cutting file is approved, not after the slab arrives. A fabricator needs enough information to distinguish a finished wall edge from a polished edge, a service opening from a decorative hole, and a measured corner from an assumed one.
Use a repeatable measurement sheet
Bring a 5 m steel tape, 1 m spirit level, laser distance meter, and a notepad with a scaled floor sketch. A scale of at least 1:20 keeps the drawing legible without turning it into a full architectural document.
Record these points for every run:
- Overall length, measured between the actual finished limits.
- Depth at each end, because a wall may taper.
- Inside-corner diagonals, especially on L- and U-shaped layouts.
- Sink-bowl centre to wall, with the cabinet reference noted.
- Cooktop or hob opening, including the approved appliance model.
- Finished edge profile, such as a pencil edge, bevel, or built-up detail.
- Thickness beside each run, so the shop cannot infer it from a general note.
For granite slab dimensions, BIS-linked guidance uses ±2 mm for length and breadth and ±1 mm for thickness. A measurement outside the agreed tolerance should trigger a recheck, not an informal adjustment at installation (BIS specification reference for polished granite slab tolerances).
Floor screeds need their own review. Check flatness with a straightedge, mark low spots, and remeasure after correction. Don't use a countertop tolerance sheet as a substitute for floor-preparation requirements.
Get the cut-list in writing
Ask the estimator to mark waste direction, vein direction, and vein matching before the slab is reserved. The written cut-list should identify each run, its finished dimensions, its edge treatment, its openings, and the slab or block reference allocated to it.
A showroom or supplier that also handles cut-to-size work can reduce the gap between selection and fabrication. For background on stone choices used in kitchen projects, the kitchen marble and granite guide provides a relevant comparison point, but your signed site template remains the controlling document.
Shop-floor check: If a dimension exists only in a conversation, it doesn't yet belong to the fabrication order.
Pre-Installation Checklist and Common Measurement Mistakes
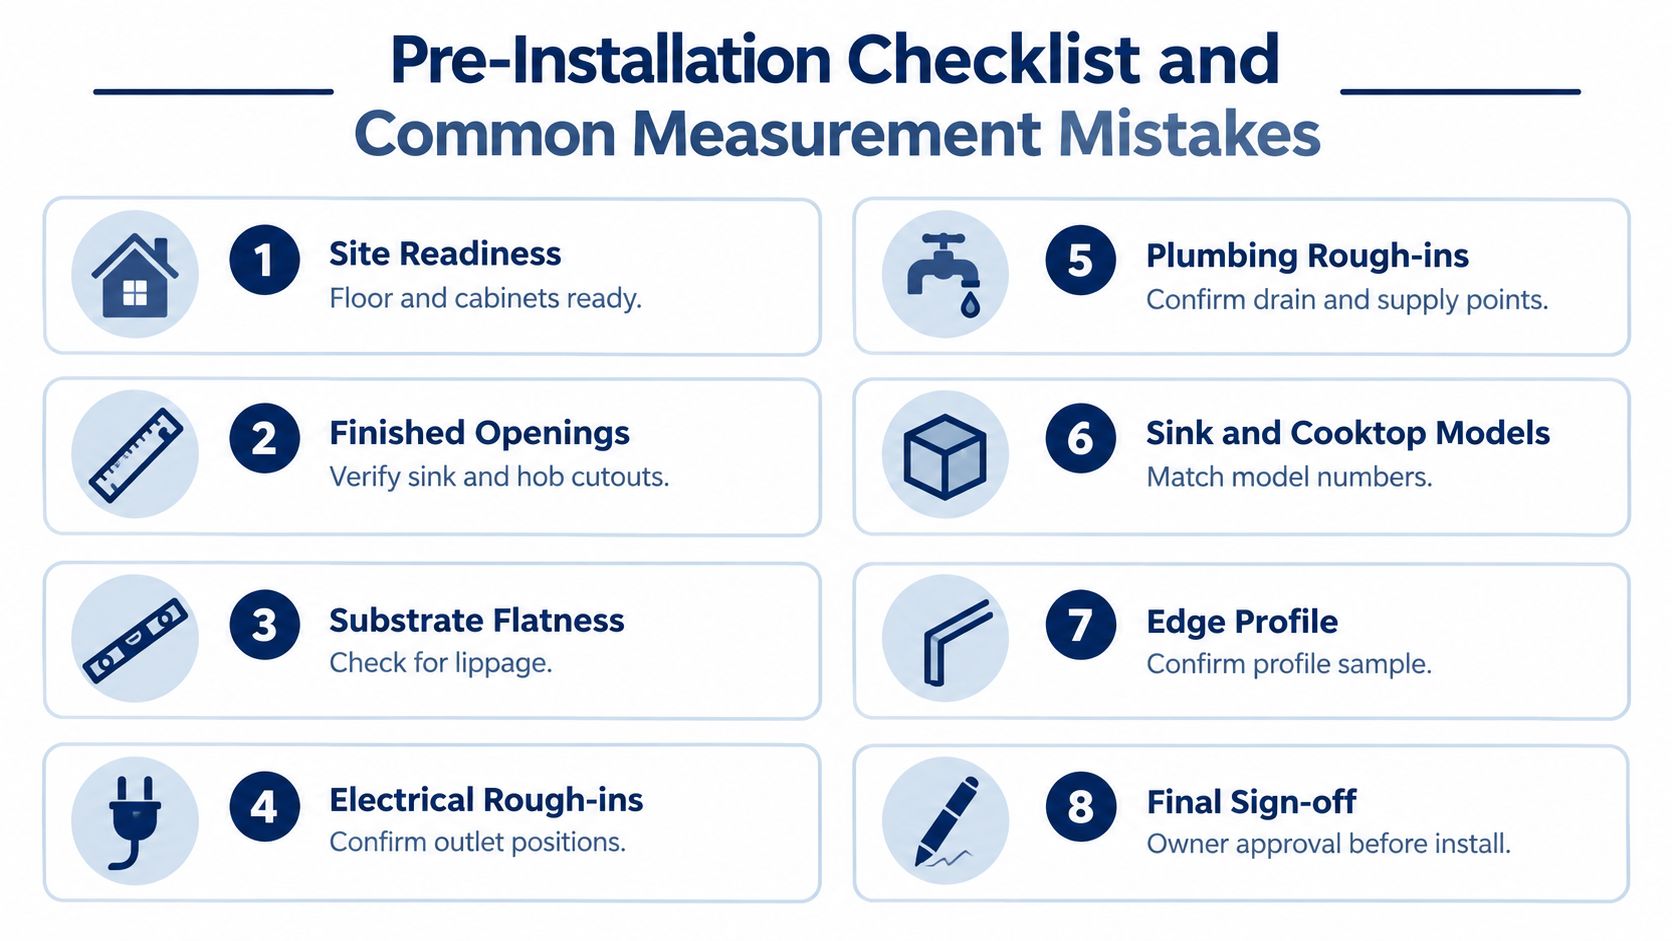
Before dispatch, the homeowner, architect, or site engineer should sign off the actual conditions. This is the short list I'd want beside the cutting file:
- Site readiness: Confirm the floor, cabinets, walls, and support members are complete and accessible.
- Finished openings: Verify sink, hob, cooktop, and tap positions against approved models.
- Substrate flatness: Check the cabinet tops or screed with a straightedge and correct low spots.
- Electrical rough-ins: Confirm outlet and appliance positions won't conflict with the stone or cutouts.
- Plumbing rough-ins: Confirm drain, supply, purifier, and tap points before fabrication.
- Sink and cooktop models: Write the manufacturer and model details beside every opening.
- Edge profile: Approve a physical or clearly marked profile for each exposed edge.
- Final sign-off: Approve the seam layout, cut-list, slab allocation, and transit protection before dispatch.
Five mistakes that delay Indian installations
- Measuring from plaster instead of finished tiles: The top arrives too deep or too shallow. Measure after the final wall finish, or record the planned build-up explicitly.
- Checking only the visible corner: A wall can vary along its length, producing a gap or a forced edge. Scribe the full wall profile.
- Ignoring window shutters: A counter may fit the cabinet line but stop the shutter from opening. Test the complete clearance above the finished surface.
- Treating a U-shaped layout as two straight runs: The corner geometry then fails during installation. Template all three sides and record both inside corners.
- Underestimating a large island diagonal: The piece may fit the plan but not the route into the room. Check access, turning space, and the finished island diagonal before reserving the slab.
The same discipline helps after installation. If an existing stone surface later develops dullness, staining, or edge damage, a specialist service such as stone restoration for facilities may be relevant, but restoration can't correct a slab that was cut incorrectly in the first place.
Varun Marbles supplies granite and other natural-stone slabs, with cut-to-size fabrication, edge profiling, finishing, and installation coordination from its Gurugram showrooms and yard. Visit Varun Marbles to review slabs in person and discuss the raw-slab, finished-cut, and installed-fit measurements before your order is released.